In March 2015, we showcased the beautiful home of local designer Brittany Fleming. Purchased in 2012, Brittany's Cottage Hill fixer-upper was truly a labor of love. Despite the amount of work the property needed, she and her dad, Terry Fleming, took on the challenge of redoing the house themselves.
The transformation from neighborhood eyesore to breathtaking bachelorette pad was featured in length in “Ranch-Style Revivial.” Since then, we have been flooded with feedback about Brittany's amazing custom-made Luke Phillips swing bed. Here, Brittany shares the supply list and instructions needed for you to create a similar piece at home.
About the Piece
The swing bed is one of my favorite spots in my home! It makes for the perfect retreat. It all started after I saw Luke Phillips' custom swing beds. He had just started making them, and I fell in love. I knew I just had to have one for my new home, I just didn't know where. I already had a twin mattress that I didn't have a use for, so I ordered one and had Luke custom make one for a standard size twin mattress. After my Dad and I completed the build on the new back deck, we decided the swing bed would make the perfect addition to swing under the trees. But I needed a frame and support system. I got to drawing out the design on a napkin at dinner one night and discussed the details with my Dad. He took my quick sketch and turned it into a working plan and shopping list for the hardware store. We gathered the supplies and got to work a few weekends later. Now, the swing bed is better than I had imagined it. It has become the “hangout” and is certainly a conversation piece!
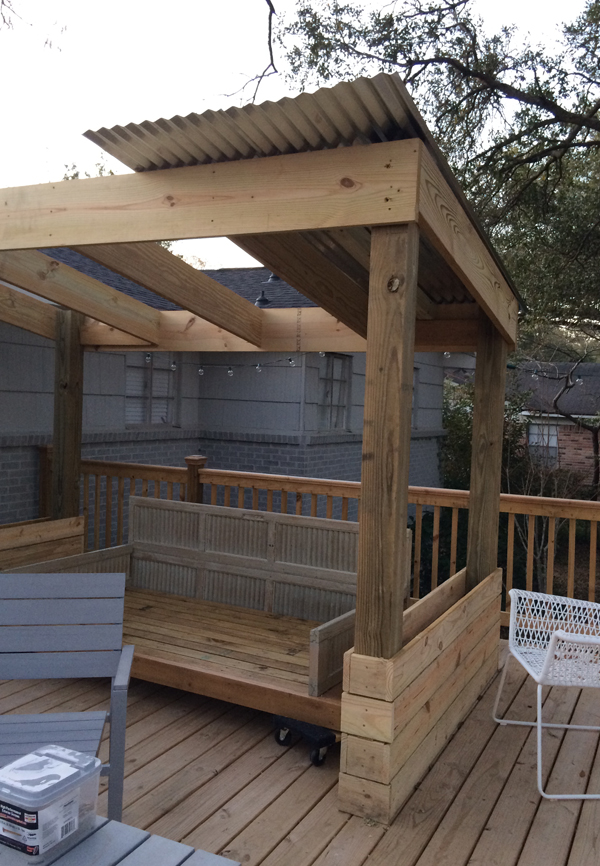

Supply List
4 – 6 x 6 posts
2 – 2 x 12s
5 – 2 x 10s
2 – 4 x 4s
8 – I bolts
8 – Carriage bolts
Deck boards for planters, chain and tin for roof
Overall dimensions
6' x 11', height of front is 8' and slopes to 7' in the back.
How We Made It
1. We started by planning the dimensions and placing the 6 x 6 posts in place. We added the outside framing using 2 x 12s to keep the 6 x 6s in place.
2. Then came the cross supports of the 2 x 10s for added strength and the tin roof support. Next we added the tin top roof.
3. To support the actual swing, we used 4 x 4 posts to secure the bolts and chain.
4. We then added planters to the sides using deck boards that we had left over from the deck project. We included vinyl deck boards (with holes for draining) for the bottom of the planters so we would not have to worry about rot.
5. We actually hung the swing by using car jacks to get it level and placed in just the right spot before cutting and placing the chains.
6. I added the antique windows myself for added Southern charm!
To see more of Brittany’s design work and follow her home renovation journey,
check out her blog at brittanymorgan.com.
Photo by Summer Ennis


